Spring 源码解析
Spring 源码解析
一、Spring 基础概念
1.1 Environment
Environment 表示当前 Spring 应用运行的环境,包括了该应用的 profile 和 property 信息。
1.2 BeanFactory 与 BeanDefinition
BeanFactory 是 Spring IOC 容器的基础接口,负责管理 bean 的实例化、配置和装配。
loadBeanDefinitions()
关于 BeanDefinition 的加载,以 XmlWebApplicationContext 类的 loadBeanDefinitions() 方法为例,其通过 XmlBeanDefinitionReader 从 XML 配置文件中读取 bean definition。
📖 独立文章:Spring Bean 完整生命周期
1.4 Aware 接口
Aware 接口是 Spring 提供的一系列回调接口,实现 XXXAware 接口的 bean 可以通过回调的方式由 Spring 容器将框架内部的对象通知该 bean。
但实现 XXXAware 接口本身并不会自动带来任何功能,只是表明这是一个待处理的 bean。实际的处理由 BeanPostProcessor 的实现类来进行。例如 ApplicationContextAwareProcessor 负责处理 ApplicationContextAware 接口。
常见的 Aware 接口包括:
BeanNameAware— 获取 bean 在容器中的名称BeanFactoryAware— 获取当前 BeanFactoryApplicationContextAware— 获取当前 ApplicationContext
1.5 Bean 的生命周期
Bean 的生命周期大致流程:
- 实例化(Instantiation)
- 属性填充(Populate Properties)
BeanNameAware/BeanFactoryAware/ApplicationContextAware回调BeanPostProcessor.postProcessBeforeInitialization()InitializingBean.afterPropertiesSet()或@PostConstruct或init-methodBeanPostProcessor.postProcessAfterInitialization()- Bean 就绪,可被使用
- 容器关闭时调用
DisposableBean.destroy()或@PreDestroy或destroy-method
其中 InitializingBean 接口参与 bean 初始化阶段的生命周期管理。
1.6 Ordered
Ordered 接口用于定义 bean 或组件的执行顺序,在多处理器(如多个 BeanPostProcessor)叠加时尤其重要。@Order 注解是其便捷替代方式。
1.7 @Autowired / @Qualifier / @Primary
@Autowired:自动注入依赖,默认按类型注入。@Qualifier:配合@Autowired使用,按名称限定注入的 bean。@Primary:当存在多个同类型的 bean 时,标记优先注入的 bean。
1.8 ApplicationListener
ApplicationListener 是 Spring 的事件监听机制,通过实现该接口可以监听 Spring 容器中发布的各种事件(如 ContextRefreshedEvent、ContextClosedEvent 等)。
二、Spring IOC
2.1 BeanFactory
BeanFactory 是 Spring IOC 容器的顶层接口,ApplicationContext 是其子接口,在 BeanFactory 的基础上增加了事件发布、国际化等企业级功能。默认实现是 DefaultListableBeanFactory。
2.2 Bean 配置方式
XML 配置
传统的配置方式,通过 <bean> 标签在 XML 文件中定义 bean。
注解扫描
<context:annotation-config>:针对已在 Spring 容器中注册过的 bean,激活注解驱动的注入。<context:component-scan base-package="com.xxx"/>:不仅具备<context:annotation-config>的所有功能,还可以在指定的 package 下扫描并注册对应的 bean。- 当两者同时存在时,
<context:annotation-config>会被忽略。
2.3 FactoryBean
FactoryBean 不是普通的 bean,它作为一个工厂类,配置后实际生成的是其 getObject() 方法返回的对象。示例如下:
1 | public class MyFactoryBean implements FactoryBean<MyObject> { |
三、Spring AOP
Spring AOP 本质上是基于动态代理实现的,通过为原本的类生成代理类来实现对其功能的增强。
参考阅读:Spring AOP 源码分析
3.1 Java Dynamic Proxy
JDK 动态代理基于接口实现,被代理的对象必须实现至少一个接口。Spring 默认优先使用 JDK 动态代理。
四、Spring Boot 启动过程
先来一段众所周知的 Spring Boot 启动入口代码:
1 |
|
4.1 SpringApplication.run()
SpringApplication.run() 的核心逻辑如下,各步骤已添加注释:
1 | /** |
可以看到 Spring Boot 的启动是在 Spring 启动的基础上增加了一些特性,例如根据应用类型推断并指定 ApplicationContext 的具体实现,各阶段事件的发布(提供了一个扩展点),调用 ApplicationRunner、CommandLineRunner(又一个扩展点)等。
下面是一张详细的启动流程图,可以参考该图一步步看源码:

推荐方式:先粗读一遍源码,然后对应用进行 debug,一步步看执行逻辑以及每个步骤执行完毕后的数据以及状态,可以对细节有更好的理解。例如,有些变量是在构造器初始化时加载的配置,这个光看源码很难看到。
4.2 Spring Boot 自动化配置
📖 独立文章:Spring Boot 自动配置原理
META-INF/spring.factories
META-INF/spring.factories 配置文件的工作原理:
- 配置是 K/V 对,key 是接口的全限定名,value 是该接口的实现类的名字,可以是逗号分隔的多个值,示例如下:
1 | example.MyService=example.MyServiceImpl1,example.MyServiceImpl2 |
META-INF/spring.factories配置文件可在多个 jar 中配置,基于这个我们可以实现自己的自动配置类,并将其配置在自己的 jar 的META-INF/spring.factories配置文件中,Spring Boot 会帮我们完成自动配置。Spring Boot 自带的
META-INF/spring.factories配置文件里已经配置了许多这样的配置项。借助 Spring 框架的
SpringFactoriesLoader可以加载META-INF/spring.factories配置文件。SpringFactoriesLoader属于 Spring 框架私有的一种扩展方案,其主要功能就是从指定的配置文件META-INF/spring.factories加载配置。
这很像 Java 的 SPI 加载机制。
4.3 AbstractApplicationContext.refresh()
上面 Spring Boot 启动过程中提到调用了 AbstractApplicationContext 的 refresh() 方法,它就是 Spring 启动时执行的核心方法,里面的执行顺序是固定的。
1 | public void refresh() throws BeansException, IllegalStateException { |
refresh() 方法的每一步逻辑都相当复杂,涉及 Spring bean 容器的很多特性以及扩展点,上面的注释对每一步做了简要说明,后续可以结合源码深入研究每一处的细节。
五、Spring XSD 扩展机制
自 Spring 2.0 版本开始,Spring 提供了一种基于 XML Schema Definition(XSD)扩展 XML 配置的机制,用于定义和配置 bean。基于该机制你可以定义自己的 XML 配置中的 tag 以及相应的解析器,并将解析后的 bean 放到 Spring IOC 容器中。
这带来的好处是通过定制一些命名空间及其中的 XML 标签,来简化使用 bean 时所需要的 XML 配置,而不是使用 <bean/> 标签来进行复杂的配置。例如我们可以通过 <aop/> 标签配置一个 AOP 的 bean。
5.1 XSD 概述
XSD(XML Schema Definition)用于表示一个 XML 文档中的元素必须遵守的一组规则。区别于 XML 原生的 DTD(Document Type Definitions),XSD 提供了定义元素及其包含的属性的数据类型的能力,以及命名空间的能力。
通过在 XML 文件中使用两个特殊属性:xsi:schemaLocation 或 xsi:noNamespaceSchemaLocation,被指定的 schema 可以用来验证该 XML 是否符合 XSD 的定义(这一过程称为 assessment)。xsi 是名字空间 http://www.w3.org/2001/XMLSchema-instance 的传统前缀。
下面是一个 Spring 项目的 XML 配置文件,可以看到其使用了 xsi:schemaLocation 属性指定了一系列 xsd,用于验证该 XML 文件是否符合各个 xsd 的定义:
1 |
|
一个 schema 包含如下几个组成部分:
- 元素声明(Element declaration),定义了元素的性质。包括:元素名字、目标名字空间。一个非常重要的性质是元素的类型,它限制了元素包含哪些属性与子元素。在 XSD 1.1 标准中,可以根据属性的值来有条件定义元素类型。一个元素可以属于一个替换群(substitution group),如果元素 E 在元素 H 的替换群中,那么 schema 许可 H 出现的地方 E 都可以出现。元素可以有完整性(integrity)约束;唯一性(uniqueness)约束,确定特定值在该元素为根的子树中是独一无二的;引用(referential)约束,确定值必须匹配一些其它元素的标识符。元素声明可以是全局的或局部的,允许同一个名字被用于一个实例文档的不同部分的不相关的元素。
- 属性声明(Attribute declaration),定义了属性的性质。包括:属性名字、目标名字空间,属性类型限制了属性可以取哪些值,也可以指出属性的缺省值或固定值。
- 简单与复杂数据类型(Simple and complex type)
- 模型群(model group)与属性群(attribute group)定义。这实际上是宏:被命名的元素的群与属性的群,可在许多数据类型定义中被重用。
- 属性使用(attribute use)表示复杂数据类型与属性声明的关系,指出属性是必需的还是可选的。
- 元素粒子(element particle)类似于表示复杂类型与元素的关系,指出元素在上下文中出现的最大与最小次数。内容模型可以包括模型群粒子,在语法上相当于非终结符:定义了允许的元素序列的选择与重复的单位。此外,通配符粒子表示了一套元素或元素序列。
其它更专门的 schema component 包括 annotations, assertions, notations,以及包含了 schema 整体信息的 schema component。
以上内容摘抄自维基百科。XSD 的核心价值在于:定义了规范之后,我们相当于获得了一套标准 XML 元素用来定义 XML 配置文档,后续配套对应的 bean 解析机制即可实现对 bean 配置的扩展。
5.2 XML 配置解析
NamespaceHandler 是 Spring 中处理自定义命名空间的核心接口,每个 XML 命名空间对应一个 NamespaceHandler。BeanDefinitionParser 负责将特定的 XML 元素解析为 BeanDefinition。
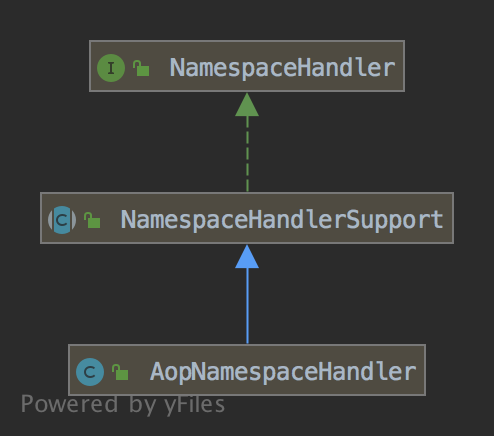
XmlBeanDefinitionReader 负责从 XML 配置文件中读取 bean definition。在解析过程中,遇到自定义命名空间的元素时,会查找对应的 NamespaceHandler,并委派给相应的 BeanDefinitionParser 进行解析。
5.3 自定义 XML 配置扩展
按照 Spring 官方文档,创建一个新的 XML 配置扩展需要四步:
- 编写 XML Schema(Authoring):描述自定义元素的 XSD 文件。
- 编写 NamespaceHandler(Coding):实现自定义的
NamespaceHandler。 - 编写 BeanDefinitionParser(Coding):实现一个或多个
BeanDefinitionParser,这是真正做解析工作的地方。 - 注册到 Spring(Registering):将以上组件注册到 Spring 中。
5.4 spring.schemas 与 spring.handlers
spring.schemas
PluggableSchemaResolver 类是 Spring 加载 XML schema 的核心类,默认寻找 jar 的 META-INF/spring.schemas 文件,spring.schemas 格式如下(以 spring-aop 包为例):
1 | http\://www.springframework.org/schema/aop/spring-aop-2.0.xsd=org/springframework/aop/config/spring-aop-2.0.xsd |
可以看到其一般格式是 systemId=schema-location,systemId 一般是 url,也就是在 Spring 的 XML 配置中引用的,schema-location 指向具体的 xsd 文件。
DelegatingEntityResolver 负责将 XML 文件的解析委派给 PluggableSchemaResolver,XmlBeanDefinitionReader 负责从 XML 配置文件中读取 bean definition。
spring.handlers
Spring 框架的每一个 XML namespace 都有其对应的 NamespaceHandler,一般在对应模块的 jar 的 META-INF/spring.handlers 文件中定义。你也可以定义自己的 namespace 以及对应的 NamespaceHandler,这意味着基于 XML 配置的机制提供了可定制化、可扩展的能力。
5.5 Spring 各模块命名空间处理器
以下是 Spring 各模块及其对应的 NamespaceHandler:
Spring Core:
| namespace | NamespaceHandler |
|---|---|
| aop | AopNamespaceHandler |
| c | SimpleConstructorNamespaceHandler |
| cache | CacheNamespaceHandler |
| context | ContextNamespaceHandler |
| jdbc | JdbcNamespaceHandler |
| jee | JeeNamespaceHandler |
| jms | JmsNamespaceHandler |
| lang | LangNamespaceHandler |
| mvc | MvcNamespaceHandler |
| oxm | OxmNamespaceHandler |
| p | SimplePropertyNamespaceHandler |
| task | TaskNamespaceHandler |
| tx | TxNamespaceHandler |
| util | UtilNamespaceHandler |
Spring Security:
| namespace | NamespaceHandler |
|---|---|
| security | SecurityNamespaceHandler |
| oauth | OAuthSecurityNamespaceHandler |
Spring Integration:
| namespace | NamespaceHandler |
|---|---|
| int | IntegrationNamespaceHandler |
| amqp | AmqpNamespaceHandler |
| event | EventNamespaceHandler |
| feed | FeedNamespaceHandler |
| file | FileNamespaceHandler |
| ftp | FtpNamespaceHandler |
| gemfire | GemfireIntegrationNamespaceHandler |
| groovy | GroovyNamespaceHandler |
| http | HttpNamespaceHandler |
| ip | IpNamespaceHandler |
| jms | JmsNamespaceHandler |
| jmx | JmxNamespaceHandler |
| MailNamespaceHandler | |
| redis | RedisNamespaceHandler |
| rmi | RmiNamespaceHandler |
| script | ScriptNamespaceHandler |
| security | IntegrationSecurityNamespaceHandler |
| sftp | SftpNamespaceHandler |
| stream | StreamNamespaceHandler |
| TwitterNamespaceHandler | |
| ws | WsNamespaceHandler |
| xml | IntegrationXmlNamespaceHandler |
| xmpp | XmppNamespaceHandler |
六、Tomcat 中部署 Spring Web 应用
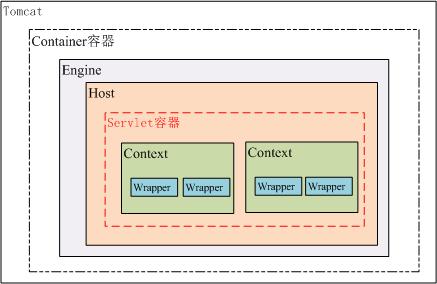
6.1 Servlet 容器
Java 的 Web 应用是基于 Servlet 的,Tomcat 是业界广泛使用的 Servlet 容器。下图是 Tomcat 的容器模型:
推荐阅读以下文章了解 Servlet 与 Tomcat 的原理:
Tomcat 中 war 的部署
Web 应用以 war 包的形式部署在 Tomcat 中,web.xml 是 web 应用的部署配置文件,其中主要配置元素如下:
| 元素 | 功能 |
|---|---|
| servlet | 指定 servlet |
| servlet-mapping | 指定 servlet 与 url 之间的映射关系 |
| filter | 指定 filter |
| filter-mapping | 指定 filter 与 url 之间的映射关系 |
| listener | 指定监听器监听 servlet 上下文事件 |
| context-param | servlet 上下文初始化参数 |
| welcome-file-list | 一般用于指定欢迎页,如 index.jsp |
6.2 ContextLoaderListener
在 Tomcat 中启动 Spring,也就是启动并初始化 Spring 上下文,在 web 应用中该上下文就是 WebApplicationContext。
WebApplicationContext 可以通过在 web.xml 中配置 ContextLoaderListener 这个 listener 实现初始化:
1 | <listener> |
ContextLoaderListener 实现了 ServletContextListener,该接口定义了两个方法可监听 Servlet 的初始化与销毁。该接口的实现类有三种方式可接收这两个通知事件:
- 定义在
web.xml配置文件中(本文描述的方式); - 加上
@WebListener注解; - 通过
ServletContext.addListener()方法添加。
如果使用了
Log4jConfigListener,需要在web.xml中将该 listener 配置在ContextLoaderListener之后。
6.3 WebApplicationContext 的创建
ContextLoaderListener 将具体的创建 WebApplicationContext 的操作委派给 ContextLoader 执行,其关键方法是:
1 | public WebApplicationContext initWebApplicationContext(ServletContext servletContext) |
initWebApplicationContext 先创建一个 WebApplicationContext,然后完成配置并调用 refresh() 方法。
WebApplicationContext的默认实现是XmlWebApplicationContext(配置在spring-web包中的ContextLoader.properties文件中),可以通过指定contextClass参数指定WebApplicationContext的实现。WebApplicationContext初始化的配置文件地址可以通过在web.xml文件中的context-param配置节中配置contextConfigLocation参数指定,如:
1 | <context-param> |
存在多个配置文件地址的情况下,后面文件中定义的 bean definition 会覆盖前面的。
还有一些其他的可配置参数可以影响 WebApplicationContext 的创建,这里没有全部列出,这些一般也是非常用的功能。
- 调用
refresh()方法实际上是调用了AbstractApplicationContext的refresh()方法,里面就是标准的 Spring ApplicationContext 的启动流程(参见本文第四章第 4.3 节),主要是 BeanFactory 的初始化以及相应的 bean 的加载与初始化。
6.4 DispatcherServlet
DispatcherServlet 是将 HTTP 请求分发至 handlers 或 controllers 的中央分发器,提供了便利的映射和异常处理功能。下面是它的一些特性:
一个 web 应用可以配置多个
DispatcherServlet,每个DispatcherServlet在自己的命名空间内运行,加载自己私有的包含了 mapping 的应用上下文。只有通过ContextLoaderListener加载的上下文是共享的。通过
HandlerMapping的实现类来实现请求到 handler 的映射,可覆盖默认实现,默认实现是:1
2org.springframework.web.servlet.handler.BeanNameUrlHandlerMapping
org.springframework.web.servlet.mvc.annotation.DefaultAnnotationHandlerMappingHandlerAdapter接口,用来适配请求和 handler,可覆盖默认实现,默认实现是:1
2
3org.springframework.web.servlet.mvc.HttpRequestHandlerAdapter → org.springframework.web.HttpRequestHandler
org.springframework.web.servlet.mvc.SimpleControllerHandlerAdapter → org.springframework.web.servlet.mvc.Controller
org.springframework.web.servlet.mvc.annotation.AnnotationMethodHandlerAdapterHandlerExceptionResolver负责 dispatcher 的异常处理策略,例如,发生某些特定异常时映射到某个错误页面。
还有一些关于 ViewResolver、MultipartResolver、LocaleResolver、ThemeResolver 的,这里不一一列出。
DispatcherServlet 的创建
DispatcherServlet 的类继承关系:DispatcherServlet → FrameworkServlet → HttpServletBean → HttpServlet。
Servlet 容器启动的时候会调用 HttpServlet 的 init() 方法,即调用 HttpServletBean.init(),其中会调用 FrameworkServlet.initServletBean(),进而调用其 initWebApplicationContext() 方法,创建这个 DispatcherServlet 的 ApplicationContext,并且会将 ContextLoaderListener 加载的 ApplicationContext 作为其 parent。
在 web.xml 中配置 DispatcherServlet 的示例:
1 | <servlet> |
其中 contextConfigLocation 参数指定这个 DispatcherServlet 的 ApplicationContext 的配置文件,<load-on-startup>1</load-on-startup> 表示在容器启动时就加载。
七、Spring 对 WebSocket 的支持
7.1 WebSocket 协议
WebSocket 协议定义了 web 应用的客户端和服务端之间一种全双工、双向通信的能力。使用 HTTP 协议进行初始握手,HTTP 协议内置的机制允许客户端发送一个协议升级/协议切换请求,服务端同意切换则返回 HTTP code 101,协议切换成功后,双方使用该 HTTP 请求底层的 TCP 连接进行双向通信。
WebSocket 是异步的、事件驱动的。
WebSocket 协议没有明确规定消息协议,它只是在 TCP 连接上的很薄的一层消息传递层,这导致在应用层很难实现一些功能,因此定义了 sub-protocol 的使用。客户端和服务端可在握手阶段通过请求头 Sec-WebSocket-Protocol 协商 sub-protocol。Spring 采用了 STOMP 协议,该协议已经得到了广泛支持。
由于有些浏览器不支持,以及有些代理服务器配置为拒绝协议升级或切换,或者配置了连接超时时间,需要 fallback 机制来更好地支持 WebSocket。Spring 基于 SockJS 协议提供了透明的 fallback 机制。
适用场景
WebSocket 协议适用于客户端和服务端需要高频低延迟地交互事件信息的场景,例如:金融、游戏、合作应用。
7.2 实现 WebSocket Server
Spring 4 引入了 spring-messaging 模块支持 WebSocket。目前 Spring 在 Tomcat 7.0.47+、Jetty 9.1+、GlassFish 4.1+、WebLogic 12.1.3+、Undertow 1.0+(以及 WildFly 8.0+)上支持 WebSocket。
创建并配置 WebSocketHandler
首先实现 WebSocketHandler 或扩展 TextWebSocketHandler / BinaryWebSocketHandler,然后通过基于注解的 Java Config 或者 XML 命名空间配置将 URL 映射到 handler 上:
1 | import org.springframework.web.socket.WebSocketHandler; |
XML 配置示例如下:
1 | <websocket:handlers allowed-origins="*"> |
7.3 定制化握手过程
通过实现 HandshakeInterceptor 接口来定制握手过程,该 API 暴露了握手阶段的 beforeHandshake 和 afterHandshake 方法,可用于终止握手或者添加参数到 WebSocketSession 中。
7.4 WebSocketHandler 的包装
WebSocketHandlerDecorator 提供了日志和异常处理能力。ExceptionWebSocketHandlerDecorator 捕捉到异常后返回 HTTP code 1011 表示服务端异常。
小结
本文基于 spring-boot 2.2.1.RELEASE / spring 3.2.5 版本的源码阅读,从 Spring 基础概念(IOC、AOP、Bean 生命周期)出发,逐步深入到 Spring Boot 启动过程、refresh() 方法、XSD 扩展机制、以及 Tomcat 中部署 Spring Web 应用的方式,最后介绍了 Spring 对 WebSocket 的支持。文章只是粗略过了一遍流程,有些部分可能理解有误,内部细节还有待继续研究。另外不得不说,看 Spring 源码是真的累。